Here we go!
Kate’s re-write of the
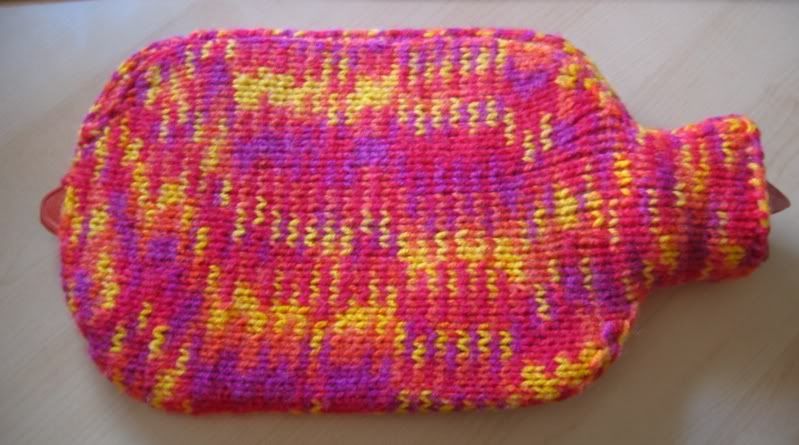
Hot Water Bottle Cosy Pattern
Hot Water Bottle Cosy Pattern
This pattern is made to cover a hot water bottle that measures approx 12” long and 7.5” wide.
Materials: Red Heart Acrylic Yarn
Needles: 7US / 4.5 mm
Gauge: 4 stitches and 6 rows = 1 inch
I’m going to write this pattern in two ways – first just re-writing the pattern as it stands, knitted on straight needles. Then I’ll re-do it in the round, for working on either dpns or a circular needle. I’m also adding a band of ribbing on each side of the closure so that it doesn’t curl up, and button holes so it can be done up nicely.
K = knit
P = purl
M = make (increase either by lifting the bar between the stitches, or by knitting first into the front and then the back of the stitch)
K2tog = knit 2 stitches together
Version One, knit flat in two pieces, on single pointed needles
The first piece starts at the opening and goes up the body of the bottle, shapes for the shoulders and finishes at the neck. The second piece starts at the opening and works down to the base, completing the first side, before folding over and knitting up the other side to finish at the neck.
First Piece
Cast on 30 sts in 2x2 rib (P2, then K2 P2 to end).
Rib band
Row 1: Knit in rib, starting with P2, then K2P2 to end.
Row 2: Knit in rib, starting with K2, then P2K2 to end.
Row 3: As row 1
Row 4: *Rib 6 sts, cast off 2 sts*, repeat from * to * 3 times, rib 6 sts.
Row 5: **Rib 6 sts, cast on 2 sts**, repeat from ** to ** 3 times, rib 6 sts. You now have 3 buttonholes.
Rows 6-8: Rib.
Body
Continue in Stocking Stitch for another 36 rows, finishing on a purl row.
Shoulders
Row 45: K1, K2tog, K2 tog, K20, K2tog, K2tog, K1 (26 sts)
Row 46 and all even rows: Purl
Row 47: K1, K2tog, K2 tog, K16, K2tog, K2tog, K1 (22 sts)
Row 49: K1, K2tog, K2 tog, K12, K2tog, K2tog, K1 (18 sts)
Row 51: K1, K2tog, K12 , K2tog, K1 (16 sts)
Row 53: K1, K2tog, K10, K2tog, K1 (14 sts)
Neck
Continue in Stocking Stitch for 15 rows. Cast Off.
Second piece
Cast on 30 sts in 2x2 rib (P2, then K2 P2 to end).
Rib band
Row 1: Knit in rib, starting with P2, then K2P2 to end.
Row 2: Knit in rib, starting with K2, then P2K2 to end.
Row 3-8: Continue knitting in 2x2 rib as in first piece, omitting buttonholes.
Body
Continue in Stocking Stitch for 6 rows.
Base of first side
Row 15: K1, K2tog, K2 tog, K20, K2tog, K2tog, K1 (26 sts)
Row 16 and all even rows: Purl
Row 17: K1, K2tog, K2 tog, K16, K2tog, K2tog, K1 (22 sts)
Row 19: K1, K2tog, K2 tog, K12, K2tog, K2tog, K1 (18 sts)
Row 21: K1, K2tog, K12 , K2tog, K1 (16 sts)
Row 23: K1, K2tog, K10, K2tog, K1 (14 sts)
Row 25: K5, Cast Off 4, K5.
Row 26: P5, Cast On 4, P5.
Base of second side
Row 27: K1, M1, K10, M1, K1 (16 sts)
Row 28 and all even rows: Purl
Row 29: K1, M1, K12, M1, K1 (18 sts)
Row 31: K1, M1, K1, M1, K12, M1, K1, M1, K1 (22 sts)
Row 33: K1, M1, K1, M1, K16, M1, K1, M1, K1 (26 sts)
Row 35: K1, M1, K1, M1, K20, M1, K1, M1, K1 (30 sts)
Row 36: Purl
Body
Continue in Stocking Stitch for 50 rows, ending on a purl row.
Shoulders
Row 87: K1, K2tog, K2 tog, K20, K2tog, K2tog, K1 (26 sts)
Row 88 and all even rows: Purl
Row 89: K1, K2tog, K2 tog, K16, K2tog, K2tog, K1 (22 sts)
Row 91: K1, K2tog, K2 tog, K12, K2tog, K2tog, K1 (18 sts)
Row 93: K1, K2tog, K12 , K2tog, K1 (16 sts)
Row 95: K1, K2tog, K10, K2tog, K1 (14 sts)
Neck
Continue in Stocking Stitch for 15 rows. Cast Off.
Finishing
Lay out the two pieces, right sides together, with rib bands overlapped. Pin together, and sew up sides. Sew on buttons under buttonholes.
Version Two, knit in the round in one piece, on dpns or a circular needle
This time we start at the base and work up the body to the neck, all in one piece. Working in the round means that every row is knit, and it omits the need for so much sewing up!
Rib band
On single pointed needles, Cast On 30 sts in 2x2 rib (P2, then K2 P2 to end). Leave a long tail so that you can sew up with it.
Row 1: Knit in rib, starting with P2, then K2P2 to end.
Row 2: Knit in rib, starting with K2, then P2K2 to end.
Row 3: As row 1
Row 4: *Rib 6 sts, cast off 2 sts*, repeat from * to * 3 times, rib 6 sts.
Row 5: **Rib 6 sts, cast on 2 sts**, repeat from ** to ** 3 times, rib 6 sts. You now have 3 buttonholes.
Rows 6-8: Rib.
Keep this band on the single pointed needles for now and put it aside – we will pick it up later on.
Base
Cast on 28 sts, leaving a long tail to use for sewing up later. Join into a round. The tail also indicates where the start of the round is, for later reference.
Round 1: K1, M1, K10, M1, K2, M1, K10, M1, K1 (32 sts)
Round 2 and all even rounds: Knit all stitches
Round 3: K1, M1, K12, M1, K2, M1, K12, M1, K1 (36 sts)
Round 5: K1, M1, K1, M1, K12, M1, K1, M1, K2, M1, K1, M1, K12, M1, K1, M1, K1 (44 sts)
Round 7: K1, M1, K1, M1, K16, M1, K1, M1, K2, M1, K1, M1, K16, M1, K1, M1, K1 (52 sts)
Round 9: K1, M1, K1, M1, K20, M1, K1, M1, K2, M1, K1, M1, K20, M1, K1, M1, K1 (60 sts)
Body
Round 11-16: knit 6 rounds
Rib band
Round 17: K30, P2, then K2P2 to end of round.
Rounds 18-23: repeat as for round 17.
Round 24: K30, then Cast Off the stitches as you P2, then K2P2 to end of round. Pull the loop of the last cast off stitch to be quite large, and pass your ball of yarn through the loop. Pull to tighten.
Body
Round 25: K30, then knit from your buttonholed rib band on the single pointed needles.
Continue in knit for another 36 rounds.
Shoulders
Round 61: K1, K2tog, K2tog, K20, K2tog, K2tog, K2, K2tog, K2tog, K20, K2tog, K2tog, K1 (52 sts)
Round 63: K1, K2tog, K2tog, K16, K2tog, K2tog, K2, K2tog, K2tog, K16, K2tog, K2tog, K1 (44 sts)
Round 65: K1, K2tog, K2tog, K12, K2tog, K2tog, K2, K2tog, K2tog, K12, K2tog, K2tog, K1 (36 sts)
Round 67: K1, K2tog, K12 , K2tog, K2, K2tog, K12 , K2tog, K1 (32 sts)
Round 69: K1, K2tog, K10, K2tog, K2, K2tog, K10, K2tog, K1 (28 sts)
Neck
Continue in knit for 15 rounds. Cast Off.
Finishing
Turn cover inside out and pin base together. Sew up the end, leaving a hole (about 4 sts long) for the hot water bottle’s hanging tag to stick out. If your hot water bottle doesn’t have a hanging tag, sew up the end completely. Turn cover out the right way, and lay it out with the buttonhole rib band on top. Pin and discreetly sew the edge flaps down. Sew on buttons under buttonholes.
The original pattern can be found here.


1 comment:
This is oh! so clear... I will have to go and buy some new wool specially...
Post a Comment